
 Suddenly, we’re chicken farmers. Just like that, living with us are five hens, soon to be a-laying.
 We got the idea for chickens at the spring Home & Garden show in nearby
This is the story of what happened next. It’s about how I
built a Backyard Chicken
Palace
Building a chicken coop and run can be anything you want it
to be. I wanted ours to be a functional thing of beauty; after all, we will be
looking at it and living with it every day for maybe the rest of our lives. Why
not do it right? It’s not just about the eggs. It’s about the chicken
experience. What can I say? We got the bug for chickens. But I’ll tell you one
thing up front about my approach: we’re going to be eating some very expensive
eggs.
Getting started:
The first thing I did was read a bunch of chicken books.
(The best: A Chicken in Every Yard,
by Robert & Hannah Litt.) We decided we would get five peeps: an Ameraucana
(for green and blue eggs), a Black Australorp (just because they’re pretty), and two Cuckoo
Marans (for chocolate-brown eggs).
Plus a Buff Orpington, partly because a good friend has a
small flock of them in upstate New York Illinois


With so many feed stores in this part of Oregon (the southern Willamette Valley) Cottage
Grove


Our hens will live in their new home 24-7. No free roaming for
them. So I needed a space big enough and nice to use – for the chickens and for
us. And completely safe. We’ve got cats, raccoons, opossum, and sharp-shinned
hawks that patrol our yard.
 The most helpful online site was BackYardChickens.com, where I found
wonderful plans for a coop that was close to perfect for what I wanted (Wichita Cabin Coop).
Imagine that: someone in
The most helpful online site was BackYardChickens.com, where I found
wonderful plans for a coop that was close to perfect for what I wanted (Wichita Cabin Coop).
Imagine that: someone in  My other grandparents, Andrew and Emily Schmidt, raised
chickens on their farm not far from
My other grandparents, Andrew and Emily Schmidt, raised
chickens on their farm not far from
I knew my chicken coop project was going to be expensive,
but hoped to keep it under $1,000 (wishful thinking). I drew scaled drawings on
11” x 17” graph paper – of the foundation, each of the sides, and the roof.
I’ve never built or framed anything like this, so making exact drawings ahead
of time made it far easier to build. That way I knew, for example, how all the framing
studs attached. And it made it easier to determine how much material to buy.
Here are some background basics. My main tools, aside from
simple hand tools and a tape measure, were: Skill saw, cordless drill and power
drill, light (brad) nail gun and compressor, 4-in power sander, router on small
table, and saber saw. (My radial‑arm saw died ripping a green treated stud just
as I started framing and didn’t get fixed until my coop was done.) I used exterior
screws throughout, pre-drilling everything because of the brittle kiln-dried
studs. (I didn’t want to have to wait for green lumber to dry before painting.)
I used the nail gun to temporarily hold studs in place, and to install trim.
I built it solo, about half on-site (in the wetOregon
I built it solo, about half on-site (in the wet

I picked a spot for the coop and run along our backyard wood
fence, protected and about half shade. The footprint is 9’ 6” x 5’ 2”.
Before starting work, I talked to Don, my neighbor. I assured him, no roosters. He was fine with it. It seems that most everyone around here either raises chickens, or used to raise chickens, or knows somebody who raises chickens. Who doesn’t like chickens?
Here’s a summary of materials, most everything from
- 2” x 4” kiln-dried studs – 40 (8’), 2 (10’)
- 2” x 4” treated studs – 6 (8’), 2 (12’)
- 2” x 6” treated boards – 2 (8’); 3 (10’)
- 4” x 6” treated lumber – 3 (10’)
- 1” x 6” cedar board – 1 (8’ - for ramp)
- 1” x 4” pine boards – 10 (8’)
- 4’ x 8’ sheathing plywood – 1 (5/8”)
- 4’ x 8’ siding plywood – 4 (½”)
- ½” galvanized hardware cloth – 3’ x 60’
- Joist hangers – 8
- 2’ x 10’ Suntop roofing panels (gray) – 6
- Roofing screws – 1 lb.
- 2’ Suntuf roofing closures – 6 (5-pack)
- Roofing silicone calk – 2 tubes
- Vinyl gutter and downspout – various
- 60 lb. bags Quikrete – 4
- 8” – 4’ concrete tube – 1
- Hardware – 6 door hinges, 2 handles, 2 latches, 6 angle braces, 4 window hinges, 2 latches, ramp door mat’l (4 eye bolts, 4 teflon furniture slides, teflon tube (for hole through studs), cleat, cord)
- 2½” ext. screws – 6 lb., plus smaller amounts of other size screws
- Galvanized fence staples – 3 lb.
- Landscape fabric
- Vinyl floor tile squares – 18
- Paint – Glidden Floor & Porch satin latex – 4 gallons
- Misc – caulk, spackle, Gorilla wood glue, spray foam
FOUNDATION:
Although I was impressed with the various coop plans and pics I found online, as for their foundations, not so much. I improvised for my soggy spot. I dug out a flat rectangle using spade, shovel, wheelbarrow, and some 2x4’s and a level, and transplanted some sod, ferns, and shrubs. With a hand posthole digger, I sunk 8”-diameter cardboard concrete tubes at the four corners (12” to 18” deep, depending on soil hardness), filled them overflowing with concrete, and while still wet, laid on top 4x6 treated timbers. Making sure the tube tops first were level was critical. (I used 12’ studs and a level.) When exactly level and square, I covered the corners with trash bags and let it all cure for a rainy week.


FRAMING:
Facing the outside edge on top of the 4x6 treated timbers, I
squared-off 2x4 treated boards on-side, using a few elbow anchors to help hold
in place. It all gave a nice solid base to build up from.


 While the pictures tell the story best, a few details here: The
vertical length of the front 2x4’s is 7’ 3½”; the back is 1’ lower. The center
width opening for the door is 36”. Typically, I attached studs with 3, 2½”
screws (predrilled). In the handful of places where that wasn’t possible, I used
joist hangers.
While the pictures tell the story best, a few details here: The
vertical length of the front 2x4’s is 7’ 3½”; the back is 1’ lower. The center
width opening for the door is 36”. Typically, I attached studs with 3, 2½”
screws (predrilled). In the handful of places where that wasn’t possible, I used
joist hangers.
The overhang is 2' in front, 1’ on sides, and minimal on
the back – just enough to accommodate the rain gutter.
ROOF:
At the earliest point possible, I put on the roof panels.
After all, it was April in Oregon
The opaque, gray roof panels are a step up from the cheapest
fiberglass panels available. They will last longer and are easier to cut to
size (used tin snips). They sell wood strips that affix to the roof joists and
support the corregated roof sections, which are screwed down with special
leak-proof screws.


I added a vinyl rain gutter and downspout on the back, with leaf guard. Just that little detail with hooks and joiners added about $70 to costs. But what ya gonna do?
SIDING &
I chose plywood siding because it seemed the cheapest
alternative that I could make look reasonably good. Still, it was $32 a sheet
(4 sheets). Because the coop is built inches from the 6’ property fence, the
back wall is plywood and had to be installed next. Before attaching, I used
oil-based stain to treat the back side of the plywood that wouldn’t be visible.
Coop walls were added, with the ramp opening (10” x 13”) cut
out. The inside dimensions of the elevated coop floor are approximately 34” x
4’ 8”. The 5/8” plywood floor, about 1½’ above the top of the foundation, slopes
1” back to front. Larger cracks at the top of the coop walls were filled with
spray foam.


The galvanized hardware cloth (½” screen) was nailed to the
framing openings, as shown. This was slow-going, carefully nailing (using
galvanized fence staples) every 4” or so, in order to keep the screening flat,
then facing with 2x4s (cheaper than 1x4s). The hardware cloth was expensive
($1.49/linear ft. – 3’ width), but essential. Chicken wire is too flimsy to
last long or keep out determined raccoons.


DOORS:
The center screen door, 3’ x 6½’, was built from 2x4s, as
shown, with 4 angle braces and 2 T-braces for stability. The screen (hardware
cloth) was backed with routed 1x4s.


The coop door is approximately 2½’ x 5’, built from 2x4’s
and plywood. The window (with hardware screen inside it) is built around a 11”
x 14” glass pane, using double layers of 1x4s.


NEST BOXES:
I cut an opening (16” x 27½”) and added two nest boxes,
each approximately 13” wide x 13” deep x 16” high (sloping to 12½”on outside). The floor slopes slightly to the
inside, with a gap below the 1x4 board on the inside, for ease of cleaning. A
removable 1x4 board will hold in bedding. The outside lid has a strip of vinyl
weather seal behind the hinges to help keep out water.
Using a glass door from an old entertainment center, I built
a horizontal window above it, as shown.


FINISH WORK :
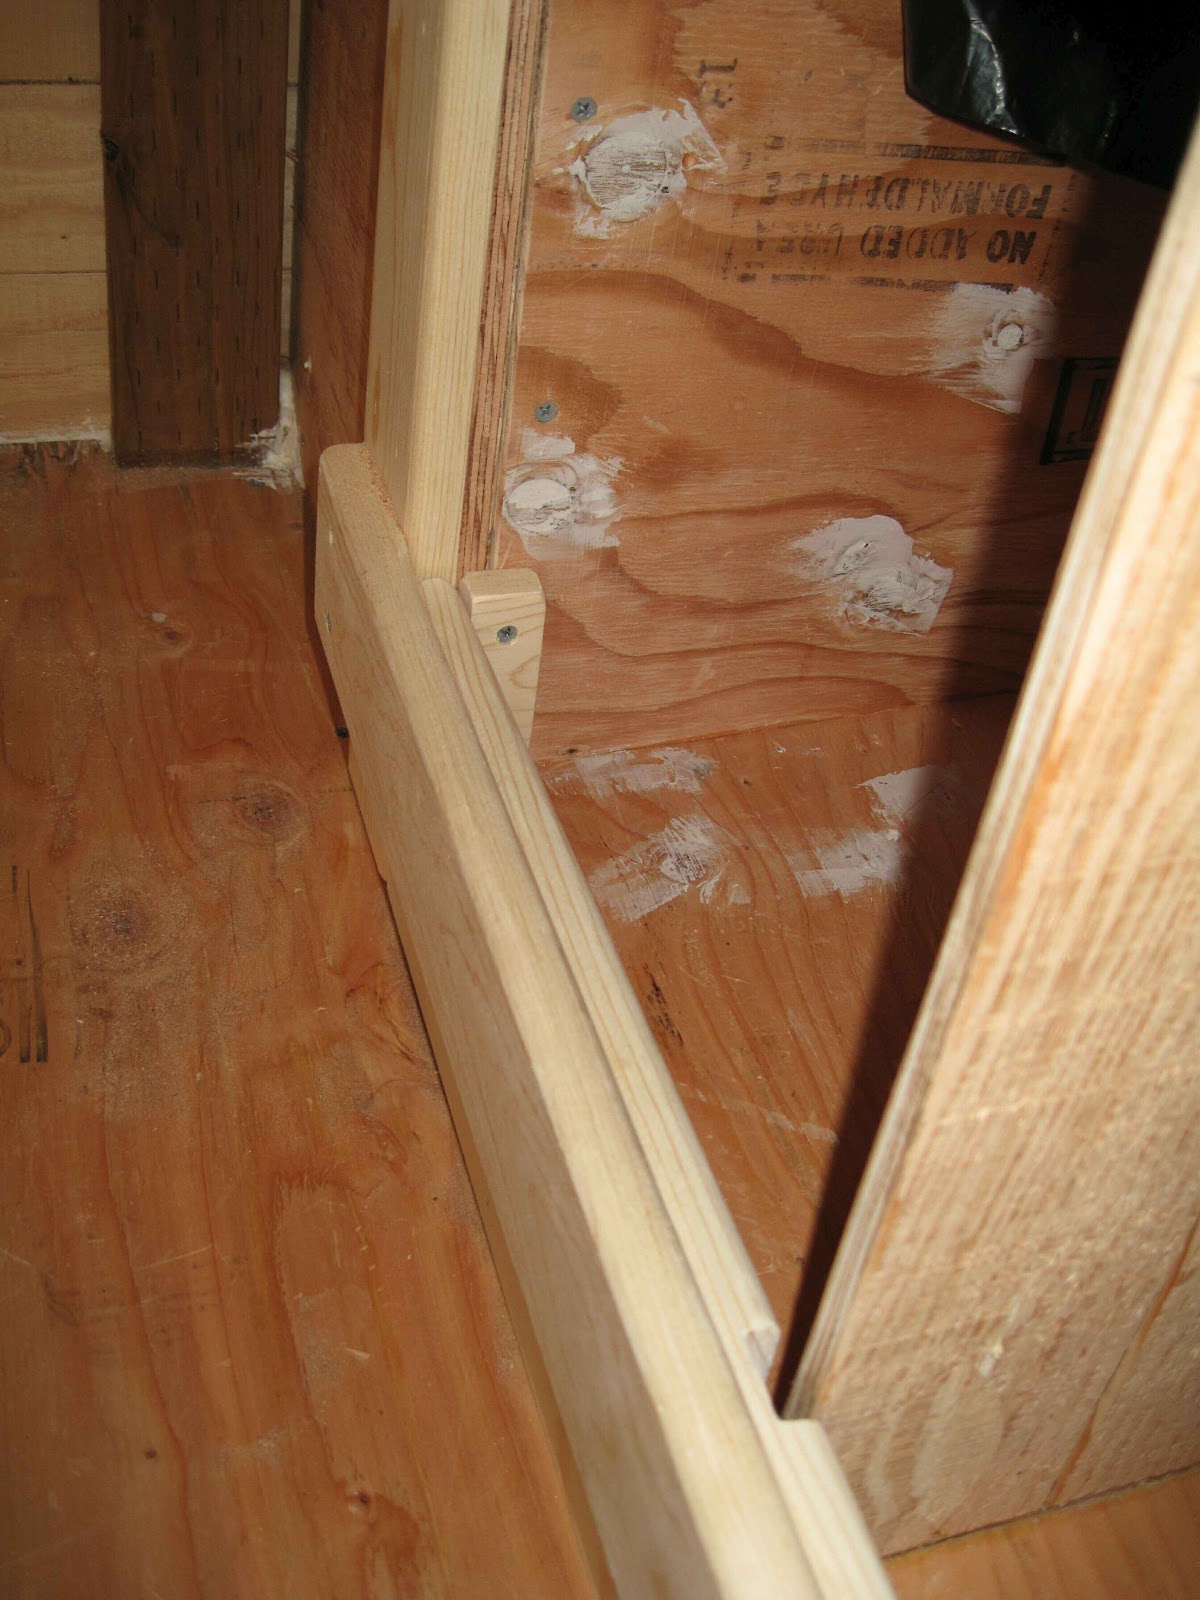
The pictures show the ramp door details. The cord to open it
simply threads through eyebolts to an outside cleat. The angled hole to the
front is lined with a nylon tube. The door has teflon furniture sliders added
on the wall side.
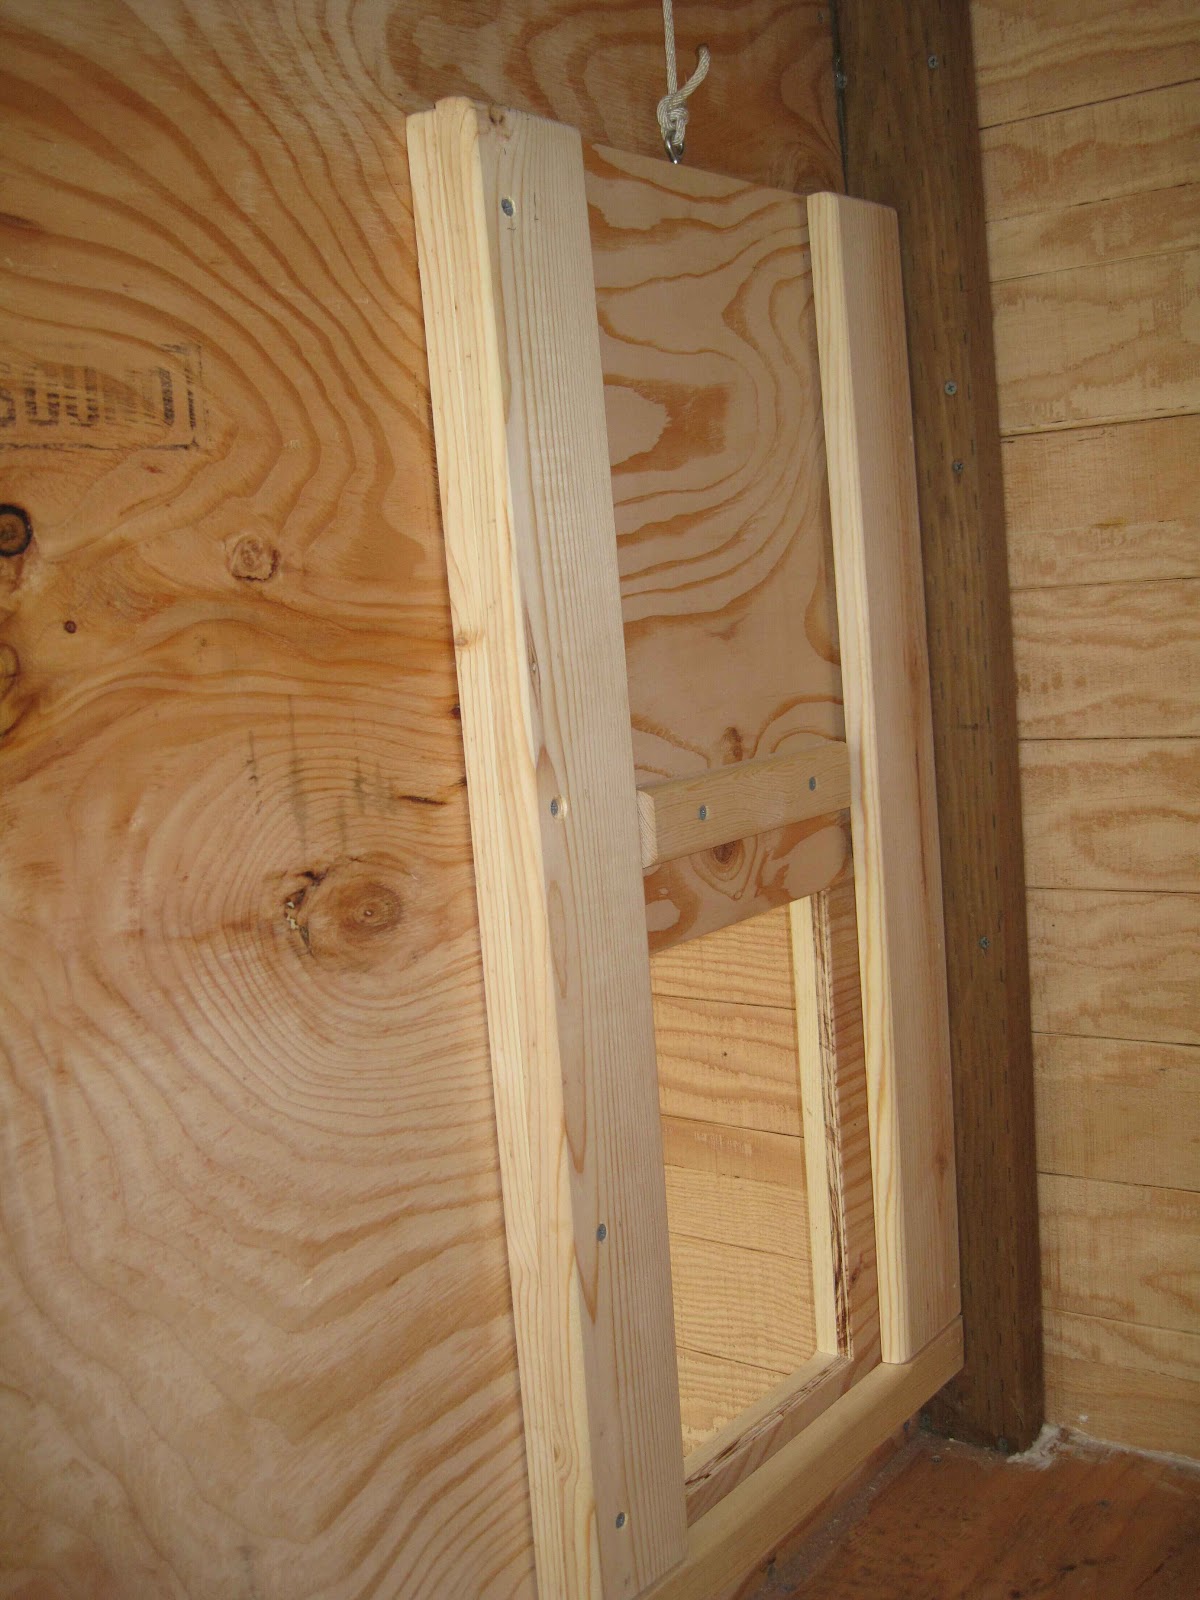


The ramp is from a rough-finished cedar board (3/4” x 5’),
with “steps” every 4”. Eyebolts hold it in place (2 cut open with hacksaw).


Two roost bars in the coop were fashioned from ripped 2x4’s,
rounded on top, with no-slip strips added on top. Shelf brackets hold the top
one, and also the fount and feeder in the run.
I added a removable plywood board at the coop opening (to
keep the chickens inside when the door is open), as well as a removable 1x4
board just inside that to hold the bedding away from the door.


I laid cheap vinyl self-stick tiles on the floor of the coop and nest boxes, just to help protect the plywood.

Lastly, a bit of caulking around seams and touch-up paint
here and there, and the deed was almost done!
To protect against burrowing critters, I installed a layer
of hardware cloth on the ground and up the inside foundation timbers, then
added a layer of landscape cloth atop that. A cubic yard of river sand went
inside the entire run, to a depth of about 5”.


The last step was relocating some landscape plants and low-voltage
outdoor lighting.

None too soon. At just five weeks of age, the girls had
outgrown their brooder and were looking for new digs.

WELCOME HOME, CHICKS:
 |
| Miss Buffy |
 |
| Miss Coco |
 |
| Miss Loco |
 |
| Miss Aussie |
 |
| Miss Connie |
They are some happy girls, it would appear. I enticed them out of their coop into their run for the first time with chopped hard-boiled egg whites – their favorite treat. If the nights get too cool, I can turn on the 250 watt red brooder lamp temporarily hanging inside their coop (with an extension cord). I hope to add an electrical outlet in the coop for a light and timer before next winter. In case you're wondering about the total price tag: $1,300 for the coop, plus about $150 for the chicks and supplies.

QUESTION:
Was it worth it?


UPDATES
August 1, 2012:
It’s been a bit longer than three months since I finished the coop, and life with our chickens is becoming routine. So now the question you might have, if you’ve made it this far in my story, is “what would you do differently in building your coop, now that the chickens are part of your life?”
My answer: Really, not much of anything. The coop seems just the right size
for five hens. They get plenty of shade (important), with enough sun to keep
them happy, it appears. The coop has proven solid and functional.
The girls put themselves to roost every night, and I close up the hatch and
windows, though I don’t think that’s necessary and probably makes me feel good
more than the chickens.
There always are a few little things. The 2-gallon water font sets on bricks
on the ground, instead of hanging like I planned. The big green plywood board
inside the coop door proved unneeded. I just shut the girls out in the run when
I’m cleaning the interior coop.
I added a roost bar across one corner of the run, which the girls fly up on
to get fed yard grass clippings through the hardware cloth.
Using sand in the run and in the coop works just fine. I use a kitty-litter
scoop to clean the interior coop sand, and the worst of the run sand about
every three days or so, although most of the chicken poop in the run just gets
ground into the sand. The worst, of course, is directly under their roosts, so
I put the plastic lid from a storage bin under the roosts, which is easy to
scrape off and hose down.
I switched over to organic layer feed a week or so ago; yesterday, we got
our first egg in the pine shavings-lined nest boxes (from Miss Buffy). Today, a
pretty little blue egg from Miss Connie (Ameraucana). It’s a start.
I hope you get as much happiness from your chickens as we do. Cluck, cluck!

August 14, 2012:
Here's a minor change I've made to improve housekeeping inside the girls' sleeping quarters. I moved the top roost bar away from the wall by 4 inches (by blocking the angle braces out with a 2x4). That keeps their poop from hitting the back wall during the night, and better collects on the plastic collection tray underneath them. BYW, all five hens roost together on that top bar; it's just about the
right length for that many birds. It was hard to picture how big they really would get as mature hens.
 |
| Aug. 22, 2012 |
October 6, 2012:
I'm learning what "pecking order" really means. Miss Coco beats up on Miss Connie who really thrashes Miss Loco, who has lost all her butt feathers and looks as if she went through the washing machine and drier. (Miss Buffy and Miss Aussie watch with distant disdain their sisters' squabbles.) I've tried to enrich my chickens' lives with diversions of new perches, scratch blocks, veggies, and bright, shiny objects (kind of like if they were teenagers). I even gave them a Mexican rooster, as you see in the following pic, that I picked up last month in Tucson. That's also where I got the mesquite, from a scrap pile of Ben, my furniture-making friend there, which became the Mexican rooster's permanent perch.
The hens haven't commented on their new artwork, but they've been pretty distracted scratching since I added some temporary chicken-wire fencing to enclose their part of the back yard. I let them out when I'm about and able to keep the local cats at bay. The girls do appear happier and less focused on their goddamned egos and pecking order. In their spare time, they've been giving us three to five lovely brown, buff and blue eggs most every day.


The other upgrade to my chicken palace is underground wiring. They now have lights on a timer to wake them up early and, hopefully, keep their egg production up during the looming gloomy winter months. I also have an outlet for a heat lamp to keep them a tad warmer on rare times when it gets much below freezing here in this part of Oregon.
December 8, 2012:
Deck the coop . . .

January 18, 2013:
"The Death of Miss Buffy" -- http://wayneaschmidt.blogspot.com/2013/01/the-death-of-miss-buffy.html
April 28, 2013:
More than 600 people from all around the world have read
this blog since I posted it one year ago, including 56 in just the last month.
That's pretty amazing to me.
Here's an update, using questions I think readers might
have:
Is it all worth it?
Yes. I'm now addicted to hardboiled eggs, and eat at least
one every day. The quality and taste of our eggs is wonderful. Not priceless,
however.
I noticed this morning that organic eggs at Walmart are over
$5 per dozen. Figure that between my wife and I, we eat maybe three eggs a day.
At that rate, we should break even with our backyard chickens in about three
years.
That is beside the point, however. Chickens are just plain cool.
There's a reason why so many people have them, and it's not only about the
eggs. I wish we had room for a dozen more. You have to live with chickens to
understand, I suspect.
After a year's use, anything about your coop's design that
you would change?
Nothing major. I would enlarge clearance tolerances in the
doors and windows to account for swelling wet wood and, more importantly,
debris.
By the way, using sand in the coop's inside run works fine. The
hens love their dust baths, and it supplies grit. From time to time I rake out
the worst of the poop with a kitty-litter scoop. If it gets packed down, I
break it up. That's about it. On the floor of the inside roost area, I have
been using a combination of pine shavings and sand. In the nest boxes, just
pine shavings.
What about your hens would you do differently?
Get rid of my bad girl sooner, even if it meant a chopping
block. As noted earlier, our Americana Eugene
What else have you learned about raising urban chickens?
That chickens don't replace feathers until their next molt,
and that can take a long time. Two of my remaining original hens still have
ugly bare patches on their butts, thanks to bad girl Miss Connie.
I've also learned a bit about what makes for happy chickens.
I didn't appreciate the importance of an outside run area (which I added last
summer), along with its chicken-luxuries of scratching, sun-bathing, and eating
everything even remotely edible. As large as my coop and indoor run is, if my
hens had to be confined 24/7, I wouldn't feel comfortable having more than
three hens in that size space.
We've also learned that hens are noisy, once they are up and
want to be let out of their coop. It's not an awful sound, but it means getting
up and shutting the bedroom windows.
Have you replaced any chickens?
See my link, above, to "The Death of Miss Buffy."
We have three new girls now -- two Buff Orpingtons, Miss
Kelly and Miss Jen, and one Lohman Brown, Miss Lola -- that are growing fast.


How are you introducing the new chicks to the
one-year-old hens?
At the suggestion of my urban chicken store expert (The Eugene Backyard Farmer), I
permanently fenced off and gated a portion of the chickens' backyard area. For
now, I'm bringing out the three new chicks and letting them roam in that area
for a good portion of the day, then returning them at night to their chick home
inside the garage.


The idea is that the older hens have a chance to get
acquainted before they are put in the same space. I plan to introduce the
chicks at about eight weeks of age.
I'm skeptical of the "getting to know you"
theory, however. One of the older hens with the apt name of Miss Loco has evil in her
eyes. She's at the bottom of the current pecking order and appears anxious to
beat hell out of the new kids.
I'll stick with the plan, but it's a pain. Their transport
is a big plastic bin. Catching them in the open run is getting more and more
comical, now that they have figured out what their wings are for. This morning,
two chicks went airborne as soon as their lid opened, and catching them without
the neighbor's gray cat discovering easy new sport was a bit of a challenge.
But it's all worthwhile. As I write this, Miss Coco is
napping next to my chair, softly clucking at me from time to time, connected to
me by her pure chicken-love -- love for snacks, that is, which can appear
unpredictably from my hands -- a constant miracle to her pea-brain.

May 18, 2013:

I'm amazed that people still are finding this blog and,
apparently, actually reading it, although that's just an assumption on my part.
More than 800 "pageviews" so far. Good. That's why I wrote it.
As I've said, who doesn't like chickens? It's kind of like
having an aquarium in your house. Mesmerizing. They scratch. They cluck. They
shit. They lay eggs. And speaking of scratch, imagine if you could be made the
happiest you've ever been in your life by just a handful of cracked corn? Every
day for the rest of your life. That's the thrill of chickendom.
I've got to say, it remains for me very weird to think that
readers in places such as Slovenia, China, Malaysia -- all manner of worlds
away that I know nothing about, living in cultures that I can't even imagine
(France! for the love of god) -- are sharing in my education about my little
flock of backyard chickens in the Willamette Valley of western Oregon.
Our six hens, the three from last year and the three younger
from this year, have adjusted to life together with few lost feathers. It's
good they aren't coop-bound, however, as I added the outdoor run last winter.
It gives the new chickies room to stay out of the way of the older girls.
Despite the fact that our two Buff Orpingtons will soon outweigh their older
sisters, I'm pretty sure that the pecking order is permanent.
Sleeping arrangements reflect that social ranking. The new
girls aren't allowed into the sleeping quarters at night, and roost tightly
together on a branch I installed inside the screened-in portion of the coop.
Egg-laying in the boxes has been mostly peaceful, with the
new girls (now about 20 weeks old) laying daily. From the six hens, we're
getting 4-6 eggs per day lately.
I've "paved" with large cobbles most of the sloping
back side of the outdoor run. Had I left it bare, the hens were determined to
flatten the hill, one millimeter at a time, through their perpetual scratching.
The rocks appear to work. Incidentally, I brought the hundreds of cobbles home,
one five-gallon bucket at a time, from the river where I fish frequently.

So, reader, if you have made it this far in the telling of
my poultry tale, thank you. I'm (virtually) flattered. I only wish I could
share with you the taste of one of these hardboiled with a little salt:

December 21, 2014
This blog has been more popular than I ever imagined. It’s
been viewed well over 3,000 times since I first posted it in April 2012. Thank
goodness for Google, eh?
Sometimes prospective chicken aficionados go on to read
other things I’ve written on my blog – about Grand Canyon rafting, characters I’ve
met while Oregon salmon fishing, and other encounters I’ve found memorable. More
often, not.
But back to my chicken update. Most important: We’ve eaten a
lot of fabulous eggs over these years. Every day. It never gets old.
Now that winter is here and the days are short, I keep the lights on in the coop so the girls get 12 hours of light. It seems to help because we still get 2-3 eggs, on average, every day. That’s from five hens now, since we lost one of our two Buff Orpingtons a few weeks back. I can speculate on why, but don’t really know. Chickens die sometimes. And based on my limited experience, Buffs are prone to problems.
At least it wasn’t like when my first chicken pet, Miss Buffy, died earlier. This last one, Miss Jen, was just a hen, not a pet. There’s a big difference, it seems.
Here’s a quick wrap up of my urban chicken raising experience. Our “Wichita Coop” is holding up and functioning perfectly. I have had to shave down the big door and the window over the egg laying box because I made the tolerances too tight. And I never really use the fancy trap door I built inside the coop. But everything else seems to work fine.
I’ve added a framed area inside in the corner filled with fine playground sand, which the girls love for dusting. I’m still using the original sand in the main coop, and pine shavings in the upper roost area and in the laying boxes. I clean the worst of the chicken shit every 3-4 days using a kitty litter strainer.
Outside, the mulch is long gone, leaving mud in the Oregon winter rain. The girls don’t really seem to mind. I learned the importance of having an outdoor area for chickens to spend their days. I know the coop should be big enough for a few hens to spend their lives; after all, look at how commercial laying hens live. All I know is that our hens are happy chickens and scratching outside in the dirt is important to them.
Aside from the routine of feeding, watering, and cleaning every few days, there’s not a lot of work. Keeping them safe means locking them in at night and letting them out in the morning. We’ve never had to leave them inside all day; they get real noisy once they’ve had their breakfast if they aren’t let out.
I can’t think of any more tips for prospective urban chicken
farmers. Hopefully, some of this helps others take the plunge and get as much
enjoyment from their chickens as we’ve found with ours. In fact, I’m planning
on adding two more chicks next spring. You can never have too many. Can you?
March 23, 2015
 |
| Young Miss Rose |
Here I thought I was done with my little story, but chicken
life goes on. This spring, I decided to add two more hens.
Two weeks ago when our local Coastal Farm & Fleet got in
its first shipment of chicks, there I was, hoping for Rhode Island Reds, and
there they were. I told the checkout girl that the soon-to-be-named Miss Penny
and Miss Rose had just hit the chicken jackpot.
I returned a few days later with my wife, Eva, for medicated
chick feed (I mistakenly had bought non-medicated organic chick feed). The upshot:
we came home with two more – a Wyandotte (Miss Wynona) and a Plymouth Rock
(Miss Roxie). That will mean nine for our urban flock.
As it happens, we’re in the midst of a remodeling project so
I’m home every day, giving me a chance to spend quality time with the new chicks.
Their frequent handling has made all the difference; now they seem to enjoy the
attention. Hopefully, that will carry through to their big-girl behavior later
on.
 |
| Eva & Miss Roxie |
 |
| Priceless |
February 13, 2016
I continue to be amazed and a bit humbled by the number of people from all over the world who somehow find my little story. In the last month, for example, Russia, Mexico, Portugal, Canada, France, U.K, Germany, Poland, Hungary, and on it goes. Thank you.
If you enjoy my writing, I invite you to sample more at:
eBooks from BarnesandNoble.com, Smashwords.com, & iBooks:
"Bare Naked Wayne" (free) & "Life with Big Green: A Memoir" ($4.99)
"Bare Naked Wayne" (free) & "Life with Big Green: A Memoir" ($4.99)
February 14, 2025
And now, thirteen years since posting this blog, it's had more than 10,000 views. I figure that deserves an update.
After several generations of chickens in that coop, it still serves us fine. At one point, I added a second nest box since I then was up to ten hens. (It's gotten harder to put down the old girls, after they stop laying, so I just keep feeding them until their end is obvious.) I'm back to seven, and that second box was a waste of time.
The biggest improvement I added was the automatic chicken door. A godsend! No more traipsing out to the coop in the early morning. The door lets them out, and shuts them in after dark:
Farmlite Door ($110):
Farmlite Door ($110):
https://www.amazon.com/Farmlite-Automatic-Chicken-Rechargeable-Controls/dp/B0CWN8GRG2

